Coffee heat rising

The Food Blast: What to Do with It

So the kitchen still overflows with produce after yesterday’s serendipitous visit from the food rescue charity. OMG, you never saw so much food in this kitchen!

Yesterday evening M’hijito came over for dinner: a kind of “hot dish” lasagne that was not lasagne; sliced eggplant layer + cheese layer + sauce layer + different cheese layer + Costco pasta layer + cheese layer + different cheese layer + sauce layer + grated Parmesan layer. Made the sauce from some of the tomatoes.

Pretty good.

So far today I’ve made a tomato soup, using six more of the gigantic cardboard-flavored beefsteak tomatoes and a couple of summer squash. It’s pretty good, having been saved by some pork broth that I stuck in the fridge after cooking up a bunch of muy cheapo Costco pork for the dogs. And by the dregs of a bottle of wine M’hijito brought over last night.

TomatoSoup

Mostly it tastes of onion, celery, carrot, garlic, pork broth, and red wine. But it looks pretty, eh? I also added a little Pomì brand packaged tomatoes — Italian tomatoes that really are very tasty, indeed. But it wasn’t enough to goose the essence de tomate much.

The result has a nice enough flavor now, even if it doesn’t taste much like tomato. 🙄 I figure it’ll be good to add things TO: heat a handful of shrimp in a pan of it, for example. Once it’s packed away, it should also provide the basis of many light meals.

LOL! I won’t have to buy groceries until that outfit comes back around next month!

A half-dozen giant flavor-free tomatoes are still sitting on the counter. Those need to be converted into gazpacho, but to do that I’ll need to pick up a bell pepper, a bottle of tomato juice, and maybe some more cheap red wine.

As soon as I backwash the pool again (! …we’re having a little maintenance issue today…), I’ll go out, get those things, come back into the sauna that is my house, and build several quarts of gazpacho.

Then put a couple of the summer squash to marinate so as to grill them for dinner tonight, and then refrigerate the rest and the two pretty eggplants to be made into ratatouille tomorrow.

It is just. too. bloody. HOT in here to spend any length of time running the stove or the oven.

The Art of Daily Living: Frugal New Shorts

So now that I’m “thin” and the fat doesn’t seem inclined to come back, the closet still holds great wads of size 12 and size 10 Gloria Vanderbilt jeans, my favorite uniform.

Hesitated to throw these out or donate them, for fear the diet might not stick and so I might need them again. But that fear seems to have been unfounded. And now…baby, it’s HOT out there!

Them thar 105-degree temps make the size 8 jeans feel a little on the hot and uncomfortable side. I’d already made a couple of pairs of shorts out of old Glorias, and suddenly I’ve found myself wearing them all the time. Since they’re always landing in the wash and leaving me with nothing to wear, yesterday I decided to  construct several more pairs.

Here’s the trick: Gloria Vanderbilt’s “Amanda” stretch five-pocket jeans are very much your mother’s bluejeans. These things are designed to fit up around your waist, truly stodgy, and they have rather baggy pants legs: i.e., a  comfortable, conservative fit for comfortable, conservative (fat) laydeez. What this means is, if you choose to make your cut-offs from a pair that is two sizes too large (as opposed to just one size), you can let the waistline ride on your hips…and voilà! Magically, you have a pair of shorts that fit like they were made for a younger, more stylish woman.

😀

They’re pretty easy to make, though it’s a little time-consuming to do more than one pair at once. Building three pair occupied an entire evening in front of Netflix. Here’s how:

1. Estimate the desired length. Put on the jeans, stand in front of a full-length mirror, and let your hand fall to about where you’d like the hemline. Take a straight pin and insert it an inch & a half or two inches below that level. This will mark where you’ll cut off the jeans.

2. Lay the pants out flat on an ironing board, a table, or the floor, with the leg seams together. Using a tape measure and a white Prismacolor pencil (unless, of course, your jeans are white…) or tailor’s chalk, rule a line at your cut-off point, parallel to the bottom seam of the legs. The idea is to try to make both legs straight level.

3. With a sturdy pair of sharp scissors, cut off the legs along this line.

4. Heat a steam iron to “cotton” or “linen.” On the front side (i.e, don’t turn the jeans inside out, since you’re going to make a cuff that folds up and outward), turn over a narrow edge and iron it down flat. Do this for each leg.

P1030064

5. Now fold that narrow edge over on itself again, once, and iron that down flat. Using a sewing machine, stitch a steam along this narrow edge. Be careful while sewing over the side seams, as these may be bulky for your machine and could break the needle, an annoying development. Ease the needle over the side seam. Repeat on the other leg.

6. Fold a cuff up, making it the width you desire. This will depend on how much fabric you left yourself when you cut off the pants legs, on how daring you like your shorts, and on how deep you like the cuff. Put the unfinished shorts on and check, in front of the mirror, to establish the size of the cuff and be sure the result is even on both sides.

7. Iron the cuff down flat, using your measuring tape to be sure it’s the same width all the way around and that the cuffs on each leg are the same. Tack it, with thread that matches the jeans fabric (more or less), at the side seam and the inside seam, and then tack again, gently and a little loosely, at the front and back of the pant leg. This will help keep the cuff from turning inside out when you run the shorts through the washer. Repeat on the other side, checking to be sure the cuffs match.

And that’s it! Very simple!

P1030070


Adventures in Furniture Repair

The furniture in my house has a checkered past. Some pieces bear the deformities of their misadventures.

P1010996The central attraction is a set of solid birch, blonde 1950s Conant-Ball casework. It must have been pretty expensive, back in the day. At least, I think it was.

After 10 long years in Saudi Arabia, living with metal Company-issue furniture (yes: metal bedsteads, metal bureau drawers,  metal nightstands, metal everything. Anything that wasn’t metal was something they’d scrounged second- or third-hand from other Americans in camp), my parents decided that my father would quit and we would come back to the States.

How my mother pulled this off, I do not to this day know. Left to his own devices, my father wouldn’t have quit at that time. He was earning a lot of money as a harbor pilot in Ras Tanura, where petroleum products were loaded from the refinery onto American and European tankers, earning far more than he could have made Stateside. He salted every penny of it into investments (mostly ill-advised, but there’s another story), because his life’s goal was to retire at the earliest possible moment. To that end, the couple lived, shall we say, ascetically.

She must have told him she was going to leave him if he didn’t quit. If she did, it was pretty daring, because he was fully capable of saying “fine!” At any rate, she persuaded him to quit prematurely; after 10 years, he still didn’t qualify for a pension from Aramco. I expect for that he probably would have had to stay on for 15 or 20 years.

She and I came back to the States several months before he did — again, the “why” of this was never explained to me. But I can imagine.

We took a train across the country and arrived in San Francisco, where she set up housekeeping in a very pleasant apartment on the sixth floor of a very pleasant high-rise in a very pleasant lily-white middle-class apartment development. The first thing she did was to take herself to Sloan’s, a very nice (all very nice) downtown furniture store, where she engaged a designer to furnish the entire rather large dwelling.

P1010998The effect was amazing, unlike (I’m sure) anything my mother had ever had. All the sofas and chairs were stylishly color-coordinated, and all the wooden casework in every room but mine (she put dark maple pieces in there, for unknown reasons) was this mid-century Danish modern stuff, heavily influenced by the Shaker style.

What makes me think it was pretty good stuff is that it’s lasted 60 years despite a fair amount of abuse. And the abuse is what makes me suspect my father could have had no idea on God’s green EARTH how much she must have paid for it.

This was a guy who thought Levitz was upscale and a bit rich for our blood.

When he finally did accumulate the hundred grand he thought he needed for retirement, he moved her and himself to Sun City, then a development out in the cotton fields west of  Phoenix, Arizona. The little house they moved into didn’t have enough room to hold both a dining room set and a television, as well as the living room furniture. Given a choice between furniture and the TV, my father’s choice would always be the TV. Hands down.

They had a screened-in back porch, and my father decided that he was going to convert this gorgeous set of furniture — a solid birch table, four spindle-backed side chairs and two captain’s chairs — into outdoor furniture.

My mother must have been devastated! But even then, she must have been afraid to tell him what she’d paid for it. He couldn’t possibly have had a clue.

He coated all seven pieces with layer after layer after layer of shiny polyurethane. By the time he finished, the stuff looked like yellow plastic.

He did a good job of slathering varnish (he loved polyurethane!): it was impervious to water and heat. His idea of cleaning the porch was to haul the backyard hose in and squirt everything down. And in a good monsoon, rainwater would blow through the screen and douse the set. By the time I inherited it, fourteen years later, it still had no water damage.

It was pretty horrible-looking, though, with all that polyurethane shit on it.

My then-husband and I had a friend who was seized by a passing desire to become a furniture-maker. He proposed to strip and sand off the varnish, and then I would refinish the table and chairs with Danish oil.

This came to pass, more or less. And the result actually was not bad — certainly not compared with the high-gloss polyurethane. He stripped the table and the four side chairs, but drew the line at the captain’s chairs, the project having proved to be more difficult than he expected.

The sets of cabinetry and chairs replaced the old bargain pieces and the bricks and boards with which my husband and I still furnished our home after fourteen years of wedded bliss. I took them with me when I fled.

P1010985My son now has the dining table, but I’ve kept the side chairs and the captain’s chairs, as well as the occasional tables, the bureau drawers, the dressing table, the desk, and the nightstands.

The other day, one of the captain’s chairs finally broke. Its underpinning split, causing one of the legs to come loose.

Well. I’ve always wanted to have those chairs stripped and refinished. This was my chance. A couple of guys came highly recommended on Angie’s list, so I asked them to drop by look at it. Ninety bucks, and they were willing to hand-strip (no dipping!) and sand the crud off the chairs, and to apply a new hand-rubbed oil finish.

Good.

But there was more.

Some years ago, back when I had a job and an income, I coveted a Thomas Moser coffee table. Indeed, so much did I covet the thing that I actually ordered one up!

thosmosercoffeetable.php

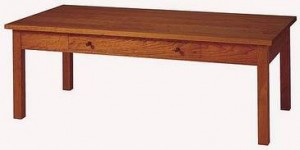
Lovely, eh? Cherry. Hand-rubbed. Nice.

Well before the six weeks required to make this bauble had elapsed, I discovered that Ethan Allen made a coffee table whose design was very similar, and whose price was a fraction of a hand-made Thomas Moser chef d’oeuvre. They were phasing out the model, and if I would come down to their shipping facility I could have it at cut- cut-rate — a tiny fraction of the Moser piece’s cost.

This appealing mightily to my cheapskate impulses, I promptly canceled the order from Thos. Moser and bought the Ethan Allen thing.

When they delivered it, I regretted having done that. It had a shiny finish, and shiny furniture really is not to my taste. It didn’t go with the Stickley side table I’d acquired at a vast discount, nor of course did it go with anything else in the house. Except maybe the polyurethaned chairs.

But…there it was. I thought it could sit there for a few days until I decided whether I could live with it.

DCP_1364That decision, however, was forthwith made for me. The thing hadn’t been lurking in the living room more than 45 minutes before Walt the Greyhound, in an uncharacteristic flash of exuberance, reared up on his hind feet and dropped one massively clawed paw on the brand-new shiny tabletop. Dug a big scratch into it!

Shit.

At the time, I was too dumb to know that my credit card likely insured it. Matter of fact, I probably was too dumb to have put it on the card. Chances are I paid cash.

Whatever. I figured I couldn’t send it back with a scratch my dog had put into it less than an hour after Ethan Allen’s delivery guys had carried it into the house. So I’ve lived with it for lo, these several years.

And I still covet the Thos. Moser coffee table.

Turns out the Ethan Allen finish was so fragile the mere force of your eyeballs staring at it could inflict a scratch. Over time it picked up many more dings, some from unfathomable sources.

Lately I’ve been thinking, what the hell; life is short, a train of thought tending toward a possible purchase. A Thos. Moser purchase. But I’d look at the table and think its wood didn’t look all that bad, and under the layers of dark stain and shiny varnish its construction looked much like the Stickley’s. And it occurred to me to wonder if I could strip and refinish it myself.  But…I’m past my handyperson days.

So when Gustavo and Manny were here I asked if they thought they could refinish it.

Gustavo speaks mostly Spanish and has the look of an old-country craftsman about him. He may just be a campesino, but he puts on a convincing show of knowing what he’s doing.

He said he thought the table was made of maple, and he pointed out that the top was not veneered — he showed me how to tell. He proposed to refinish it to match the Stickley piece rather than to apply a hand-rubbed oil finish. However, he will make several test pieces for me to approve.

He was taken by the Thos. Moser continuous-arm chair and the Thos. Moser New Gloucester rocker, particularly by their amazing joinery. And he also noticed the table that I’d paid $300 for at the model-home furniture clearance store.

I allowed as to how I thought it was junk — particle-board with a veneer — but it looked pretty good. He said it wasn’t fine furniture, but it wasn’t actually junk, either: he pointed out that the veneer is unusually thick, thick enough to withstand one sanding and refinishing. Not bad, he thought, as veneer goes.

P1020002

Well, what it all boiled down to is that Gustavo will repair the broken captain’s chair, hand-strip both chairs and the coffee table, and refinish all three pieces for less than half the cost of a new Thos. Moser coffee table & shipping. They also propose to level the annoying eight-foot bookcase in the living room.

It’ll pare down the diddle-it-away fund, but I do believe I can afford it.

🙂


New Arcadia Door Curtains: $75!

Et voilà! Now that the fine new ultra-low-E, all matching Arcadia doors were installed, I developed a craving for prettier draperies in the bedroom. The sliding doors in the dining and family doors have sheer floor-length curtains that I made shortly after moving in to the house. I ran out of steam, though, before I got to the back room. In there, a couple of layers of Pier One curtains were jury-rigged on a double rod to keep out the early-morning light…not very effectively.

While I was washing the sheers that had to be taken down for the new door installations, it occurred to me that a set of sheers laid over that cheapo peacock-colored silk curtain just might look pretty nice. They would attenuate the gaudiness of the eye-popping teal, which picks up a more subdued teal on the bedroom’s accent wall. And with windows that no longer radiate heat like a wall furnace, the blue-green things could be slid open, allowing sheers to filter the light and making the room look pretty nice.

So it was off to Fabric Depot, the one surviving fabric store within 15 miles of my house, to pick up the nicest sheer white nylon they had, in 96-inch lengths. They didn’t have the wood clip rings I wanted, but Home Depot did. Unfortunately, HD’s were too dark; however, the clips are easy to remove, and I have a shoebox full of wooden rings that lack the clips. I needed 22 with clips; I had 18 of those. So…it was just a matter of buying one package of HD’s Mediterranean-ugly rings, removing their clips, and snapping them onto my lighter-colored rings. Fabric: $68. Rings: about 8 bucks.

Making unlined draperies is a little time-consuming, but really very easy. First, get the fabric retailer to cut the cloth into the lengths you need. Wide curtain and upholstery fabric comes on rolls that fit into a machine designed to measure out the correct lengths; these have a groove along which the sales clerk can cut a pretty straight line. Once you get the stuff home, lay it out on the floor, one piece atop the other, to be sure they really are the same length.

These are folded in half—they’re actually twice as wide as they appear in the photo. As you can see, the raw edges are not exactly straight—although the saleslady did a better job than most! Straighten the edges either by running a long straightedge from selvage edge to selvage edge (usually these are straight and pretty close to parallel) or by folding the fabric up so that a selvage edge runs along the cut edge, showing where the cut edge is uneven.

Good nylon irons easily; you can press a sharp crease in it, and you also can easily press it out and press out any wrinkles. Set your iron at silk/wool, anddo not try to steam the fabric. At the lower temperatures, your iron will not steam; it will spit. Higher temps will melt nylon. Use a spray bottle to lightly dampen the fabric as you go.

Your ironing board should be well padded, and you’ll need a package of very sharp pins. Large craft pins are sometimes dull; use sharper pins designed for sewing. You’re going to use the pins to secure the hems as you press them in, and then, once a hem is properly pressed and creased, take pin it in place  preparatory to stitching it.

I started by turning the selvage over to form a narrow hem on what would be the curtain’s vertical edges. Fold it over once, pressing:

Press and pin it as you go. You can stick the pins straight down into the ironing-board cover to hold the fabric in place while you press this narrow edge, and then lift them out to secure the hem after it’s creased:

Stitch these narrow hems, and you have now finished the vertical sides of your curtains.

No, I don’t cut off or slash the selvage. And yeah, I know you’re supposed to. For one thing, nylon doesn’t shrink when it’s washed, and so you don’t risk puckering. For another, it’s more trouble than it’s worth.

You can sew these curtains on a machine or by hand. Personally, I prefer to stitch each hem by  hand. Obviously, a sewing machine will go a lot faster, but with very fine fabric, you need some real skill with the machine to avoid puckering or damaging the fabric. The effect of hand-stitching is very nice—makes your curtains look like you paid a ton of money for them. If you do use a machine, set it for fairly long stitches with a light tension.

It’s very easy, however, to sew long straight hems by handpicking with a long, baste-like whipstitch. Use a single (not doubled) strand of thread. Tie a knot on the end and start by poking the needle through the folded part of the hem. Then pick up two or three stitches from the weave of the fabric, on the side that will be the front; pull the needle through that and then back into the folded section. You can make eight or ten such stitches at a time, holding as many as your needle will take, and then pull the thread through them all at once. This speeds things along mightily.

Wax the thread to keep it from tangling as you sew. Ideally, beeswax in a special holder works the best. However, these are now pretty hard to find. You can substitute a white(!), unscented(!) candle. Lay the length of thread against the side of the candle and hold it firmly with one finger. Pull it through, coating the thread with wax.

Alternatively, you can wax a piece of thread with the natural waxy oils from your skin, but you cannot be wearing makeup to use this trick. Place the length of thread against the side of your nose and hold it firmly in place, as shown above with the candle. Pull the end so that you run the entire piece of thread between your finger and your nose. This will lightly coat the thread enough to help keep it from tangling, especially if you’re fairly young and still have an oily face. 😉

Now you’re ready to stitch the top and bottom hems. First, fold over the top and bottom edges in exactly the same way as you did the vertical hems. Because these narrow hems will not show, you can sew a simple running stitch to hold them down. Press these edge hems flat. And now you can move on to sew the actual hems.

I like a hem about four inches wide. Use a tape measure or ruler to ensure that these turn out to be the same width all the way across.

Once again: pin, press, and stitch.

You’re almost done! All that remains is to measure for the bottom hems and stitch those up.

First, clip or otherwise hang your curtains-in-progress to the rods you intend to use. I have a peculiarity with sheers, in that I like to fold the top hem over so that it lazes loosely and sensuously between the clip rings (which IMHO are about 897% easier to use than sewing on regular rings. You’ll need to do some math here: take the width of the curtain and divide it by the number of hangers you want to use. This will tell you how far apart to place the clip rings. I came up with 14 inches.

The curtain’s bottom edge will now drape on the floor.

This was the height of fashion a few years ago, and if you like that effect, well…then you’re done. But I think most of us have now figured out how big a mess and hassle it is to clean around curtains that slimpse stylishly across the flooring. So if housework is not your cup of tea or you can’t afford a cleaning lady about whose welfare you care nothing, you’ll be wanting to hem the bottom. This is very easy, much the same as hemming a woman’s skirt.

Because I wanted those peacock silk curtains in behind the sheers, I hung them before measuring the bottom hems. This was to make sure the sheers came out no shorter than the curtains behind them.

Draw the curtains together in the center. Gently pull them down—do not exert a lot of tension here—and note where you would like the bottom of the hem to fall. Place pins to mark this level in each panel. This is where the bottom of your curtain will fall.

Take the curtains down and measure the distance between the pin and the bottom of the curtain. This will be the depth of your bottom hem.

Pin up, press, and stitch your hems, and your sheers will be ready to hang. Before stitching that last seam, you might want to hang the pinned-up curtain, just to be sure you have the hems the right length and that they’re even. That extra step is a lot easier than having to rip out hems, remeasure, and restitch.

You understand, this is wild stuff, putting the sheers outside the colored drapes. But I was right: the effect is really  neat. It allows you to create several styles.

Closing the sheers over the top of the bright Pier 1 silk curtains softens the gaudiness while letting some of the teal hue be seen. It’s after dark here, so you can’t see what happens when sunlight is shining in from the other side.

You can pull the sheers open, to expose the colorful underlayment:

You can have them both opened, sort of layered so you can see both sets of curtains but also have sunlight come in. This looks a lot better in the daytime:

And, speaking of the daylight hours, pulling the underlying colored curtains open behind the closed sheers creates yet another effect, filtering the bright outdoor light and yet letting the teal shade come through. It’s hard to see with the Arizona sun backlighting the window, but to the human eye it looks pretty nice.

Here’s a view of those flipped-over hems at the top. They’re folded toward the back and clipped along the sewn part of the hem. This gives them a little more heft and causes them to drape attractively between the clip-rings.

This project took two evenings in front of my favorite videotaped TV programs plus a Sunday afternoon listening to Click and Clack and This American Life on NPR. Obviously, if you used a sewing machine you’d get through it a lot faster—you probably could put both panels together in one afternoon.

Not bad, eh, for $75!


DIY Paint Chips: How to Decide on a Color

So as I was saying yesterday, among the several things the Funny Farm needs is a new paint job. Was feeling mighty proud of the Behr paint samples I got, and expected at least a couple of the colors to look swell and elegant on the walls.

As you know if you’ve ever painted a house, those tiny little paint chips you get at the Depot or the paint store are a cruel joke. There’s NO way you can estimate what the color really will look like, because the leap of imagination between the sample and a wallful of the paint is just too large for the human brain to traverse.

One strategy is to get paint samples in the coveted shades and paint splotches on the walls, in one- or two-square-foot patches. This works effectively, but it sure makes your house look funny until such time as you make up your mind. If you’re the finicky type, “until such time” can be a while. There’s a better way, though: Make your own paint chips.

Get a pad of low-end artist’s paper from someplace like Michael’s—don’t get the good stuff for this project—or, if you’d like sturdier samples, cut up a cardboard box into as many six-inch or foot-square pieces as you have sample colors. Then simply paint the sample colors onto the paper or cardboard. Allow to dry, and then you can tape the samples to the desired walls, leave them there, and watch how they look as the light changes throughout the day.

This is an effective way to see how a given paint color will actually look on your walls. It saved me a lot of time and probably some money. The shades I thought were gonna be just great turn out to be just ugly. Of the six I tried, the only one I really liked was “peach fade.” The other off-white, which judging by the Behr paint chip looked like an extremely pale beige, looks pink when a large enough sample is hung on the wall. A better name for “Adobe straw” might be “Necco candy chocolate.” The “flint smoke” is bluish-gray, a blah color—much duller than it appears above. “Blanket brown” has a grayish overtone that clashes with the kitchen cabinetry. And…a whole house full of off-white, beige, and brown? Bleyach! There’s a reason those brightly decorated houses in Mexico appeal to me.

After staring at the colorless “neutral” color scheme for awhile, I realized that dammit, I like the colors my friend and I put in the house when I moved in here, except that I’m mighty tired of the orange hall. That orange replaces a kind of tangerine orange that came with the Alexander Julian line we were working with, and I never liked that color. That’s why I put the terra cotta color in the hallway. All the other colors are just fine.

And the truth is, I know exactly where to get a much, much better shade to cover up that orange: at my son’s house. We painted his place a kind of…hmmm…what’s the word? It’s a mellow sort of beigey terra cotta—not a harsh orange like mine—that looks really, really pretty with the saltillo floors. He still has the paint can. All that’s needed is to trot over to Dunn Edwards, buy a pint of that, and test it on DIY paint chips. I’ll bet it would look really, really nice in that hallway.

See the teal in this image? That’s pretty close to swamp blue: the color of the accent wall in the living room, which has an archway through which one views the hallway. And that salmon color on the Mexican wall is a little brighter but not very far off from the color I have in mind.

If I’m right—that most of the walls can stay the same color they already are, with a little touch-up here and there—then those home-made paint chips saved me a great deal of money. Instead of repainting the entire interior, all that’s really needed is to repaint the hall (I can do that myself!), touch up the paint around the kitchen and front doors, paint the woodwork some shade of brown compatible with the cabinetry, and maybe repaint my office. Oh…and I do want that garage painted. Adobe straw would do just fine in there.

😉


Enrich and Extend Your Moisturizing Lotion with…What Else? Olive Oil!

FaM veterans will remember the late, great post on using olive oil to condition your hair. Believe it or not, that thing has had the greatest longevity of any post ever to appear on this site. It still draws comments from new readers every few days, after all these years.

Well, a recent commenter remarked that she discovered she could extend her moisturizing lotion by adding a little olive oil. Now there’s a thought.

I had an old bottle of Keri lotion laying around the bathroom closet. Hmmm….

The problem I have with just about any body moisturizing and conditioning lotion is that they don’t do much in Arizona’s parching dry climate. You can rub it on and ten minutes later your arms and legs look just like old alligator hide again. Some face creams work pretty well, but they’re way too expensive to smear all over your body. Olive oil alone, yes, will soften and diminish that powdery, craggy dry-skin look, but it’s greasy and too much of it makes you smell like a walking salad bowl. But what if you did mix a little olive oil with some body lotion?

Why not? thought I. So mixed a few drops of Costco’s best with a squirt of Keri lotion in a mise-en-place dish.

Mixing the olive oil into the lotion worked, but it caused the lotion to curdle a bit. That notwithstanding, it worked really well on my skin—went on smoothly, immediately moisturized and improved appearance—and the light scent of the Keri lotion overrode the olive oil aroma. Interesting.

So I decided to try it with a larger sample. Here’s how it went.

First, I filled a well washed old plastic container about halfway with several squirts of Keri lotion. Then splashed in a generous dollop of olive oil:

This move, it developed, was a bit too exuberant. The result, after beating the two together with a fork, was way too oily and liquid. So I added some more lotion.

The result, when mixed thoroughly, was okay. Not great, but okay. It still had too much olive oil, and as with the beta-trial, the lotion curdled in the oil.

The amateur cosmetologist’s kitchen, however, is never without resources. Out came the immersion blender and its little food processor bowl!

After a good whipping in the food processor, the new olive oil/commercial lotion skin conditioner came out looking like this:

Hot dang! It’s creamy, light, and absolutely free of any sign of curdling! It goes on smoother, faster, and more generously than plain Keri lotion, and it does not make you smell like a salad chef!

Applied to the skin, the product does a nice job on the old-lady crepe. If you use it moderately—don’t get carried away with slathering this stuff on—it soaks in well and does not feel greasy. If you put too much on, of course, you feel like you just came out of the auto shop, but a little goes a long way. Apply it sparingly, and it works really well. The positive effect lasts a lot longer than the moisturizing effect of Keri alone.

Next time, I’d use a lot less olive oil. By carelessly splashing in a dollop, I think I started with about a 50-50 mix. Adding another squirt or two of Keri lotion didn’t help much–to get the right proportion, I would have had to add more commercial lotion than my container could hold. If you decide to try this, keep the ratio to about one part oil to three parts lotion, and maybe even less than that. It doesn’t take much olive oil to soften your skin. In experimenting, it looks like you’d do best to start with too little oil and add more slowly to reach the right combination.

But I’m kinda pleased with it! Not only does it make the elephant hide look a lot better for a lot longer, it’s even frugal: extending lotion with olive oil, which is a lot cheaper than commercial cosmetic products, has got to save money in the long run.

🙂