Coffee heat rising

Woo HOO! Girl’s Guide to Knife Renovation!

It worked. It worked, it worked, IT WORKED!!! After moping online about the scratches and gouges induced by past misguided knife-sharpening ventures, I found a guy on YouTube who describes renovation by ladies’ manicure supply!

WHAT?????

No kidding. The man trots out his wife’s nail file gear — the kind of stuff you use for acrylics, not for real fingernails — and demonstrates how to polish up a stainless steel knife.

Well. I figure nothing ventured nothing gained. The knives are already a mess: they couldn’t get much worse. Plus if I f*ck them up some more, it’ll give me an excuse to go out and diddle away $200 on a whole giant set of fancy German knives.

Right?

So…fortunately, back in the Day I used to wear bionic nails all the time. In an old disused drawer, what should I still have but a stash of files, abrasive pads, and assorted doodads.

Bear in mind, gents, that all a nail file is is sandpaper affixed to a stiff board. And it comes in many grades. The board makes the stuff highly and easily maneuverable. From the male point of view, the only problem with it is that it too often comes in pink. The way around this, of course, is simply to regard pink as “light red.”

Here we have the entire set of fine tools — slightly used, as I didn’t think about writing this project up until I got pretty far into it.

As you can see, this gear comes in a variety of forms and shapes. The acrylic gunk applied to women’s nails to create fake fingernails dries into a hard surface that is first shaped and then polished to a high sheen with various grades of sandpaper….uhm, nail files. You can get blocks of stuff — that butter-shaped thing, for example — that have a coarse surface applied over a sponge-rubber interior, allowing a great deal of versatility. Some files come with two functional surfaces, one coarser than the other. And that one that’s half pink and half white actually has three grits: a medium and medium fine on the pink-&-white side, and on the reverse side a very fine grade suitable for polishing to a high sheen. Other files, such as that square-cornered number near the top of the board, are very coarse, indeed. But noteworthy: no other products are needed to accomplish this polishing effect.

Well, I had my doubts that this scheme would do much, since steel wool hadn’t done much in the past. But nothing ventured, eh?

So here’s an expensive little fiasco: a badly scratched La Guiole steak knife. Stainless; when new, it was highly polished:

You can see why I’ve been so disgusted that I’m willing to pony up a month’s budget savings to replace my knife collection, eh?

Okay, here’s what we get after a bit of polishing, going from coarsest to finest-grit sandpaper…uhm, nail polish tools.

Hot DAYUM! Not a gouge to be seen!!!

Are they shiny new-as-fresh-out-of-the-box? No. Of course not. They’re a good dozen years old. But neither are they all gouged up. The coarser grade nail file scoured off the scratches from the ill-applied whetstone, and the series of increasingly finer grades polished the blades back up pretty darned well.

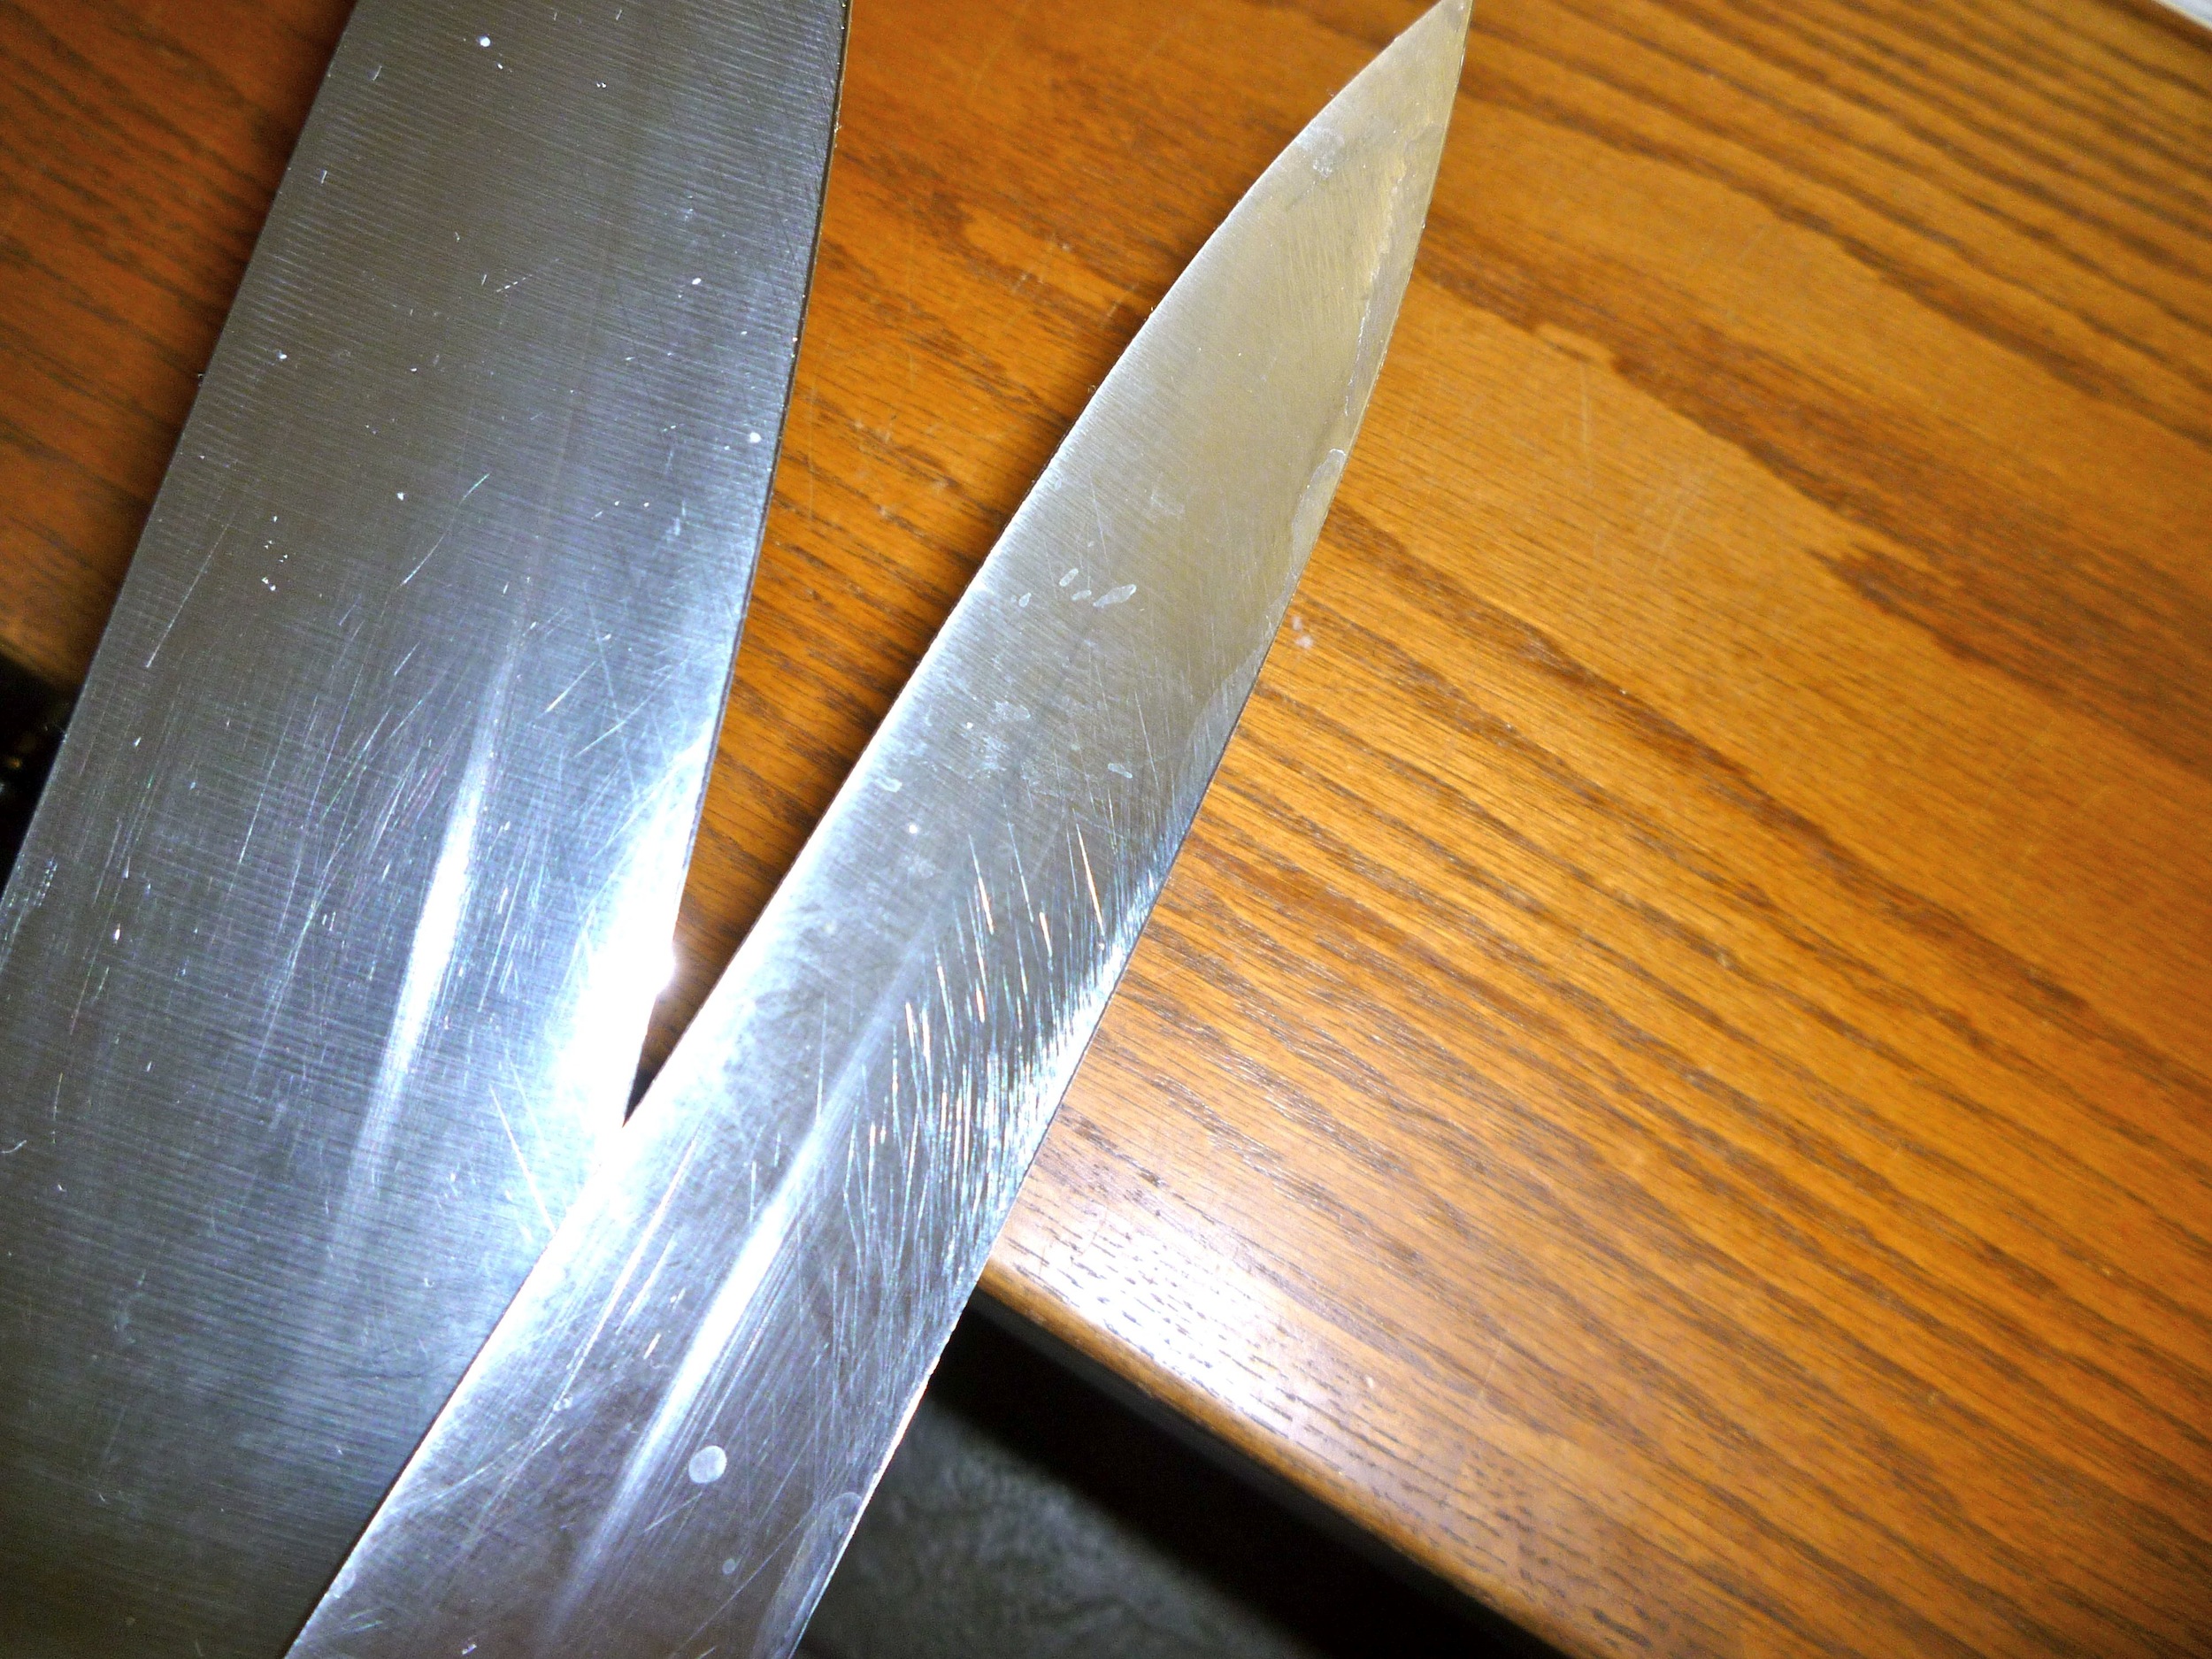
When you first apply this technique, you get an alarmingly scratchy surface — final effect is a kind of coarse satin, not a high stainless-steel gloss. Like this:

This Henckels blade, too, was tragically gouged up, with deep scratches running all the way the length of the blade, from tip to hilt. The coarser sandpaper that you start with will seem to make things worse (if that’s possible), even as it buffs off the scratches. But persist: as you apply finer and finer gauges of manicure products — i.e., sandpaper — you get a better and better result. Like these:

I hafta tell you: I am thrilled with the result. Virtually all of the scratches on these things are GONE.

Then we had the issue of the steak knives’ handles.

Those amazingly, mind-bogglingly expensive LaGuiole knives are the real goddamn thing. They are NOT a knock-off. And those handles? Those aren’t plastic. Those are made of horn. The real thing. And trust me, I did not pay a low-rent Sur la Table price for that set.

So you can imagine how charmed I was on the morning after I’d had a half-dozen friends over to dinner, one of whom volunteered to help clean up afterward. Being three sheets to the wind by 11 at night, I failed to pay much attention to what she was merrily dropping into the dishwasher. While I was washing several of the knives by hand, she was tossing the rest of them into the washer with the silverware!

Jayzus!

Needless to say, come sunrise I found the handles were wrecked. This was why I haven’t done much or cared much about the scratches, which came later. Trashed handles, gouged blades…why didn’t I just throw them directly into the garbage?

Well, I didn’t because I couldn’t bring myself to do that. And after I got laid off my job, of course I couldn’t afford to buy any other steak knives. So these have had to do.

Seeing that the nail-file treatment removed most of the scratches from the blades, I decided to soak the handles in mineral oil. What the Hell: nothing ventured, nothing gained. While I was at it, I also soaked the walnut handle of that Chicago knife in the center of the above photo, and the sort of maybe-wood handle of the Henckel paring knife on the far left.

Drenched the handles with mineral oil, wrapped them in paper towels, and left them sitting for a couple of hours.

It definitely helped the Chicago knife’s walnut handle. A lot. Don’t think it made much difference for the other ones, though. I’m thinking, however, that it’s possible a coat or two of bowling-alley wax (you remember: Johnson’s wax? do they still make it?) might approximate the original finish on the LaGuiole knives.

At any rate, I account this whole project to be a major success. And now I feel exactly zero craving to buy any new fancy knives.

Frugalista Frolic

As you know, SDXB is the King of Cheap: this is a guy who can live comfortably on practically nothing. One of his habits — one that used to abhor me no end — is washing out plastic baggies and using them again.

SDXB used to make me crazy by insisting on washing every baggie and leaving them around the sink and drainboard to dry. At one point I suggested we should run the things through the washing machine. But of course he poo-poo’d that idea — partly because it came from the Little Woman…but better yet, because he was right; running those cheapie baggies through the wash would make the precious things fall apart forthwith.

Well, I’ve developed quite a fondness for those Ziplock bags with little zipper pulls on them. Unlike regular Ziplocks, they’re easy to open and close. Also unlike regular Ziplocks, they’re brain-banging pricey.

HowEVER….  The fancy zippered things are another critter altogether from the old ones. You can wash the things in a washer — many times. They do not wear out easily. And y’know, if one of these things costs three times as much as one with no zipper gadget on it but you can re-use it twice (1 use, 2 uses, 3 uses), then you actually pay the same for it as you do for the cheapie bag. Use it more than three times, and it costs significantly less than one cheaper baggie.

One FaM reader, back in the day when FaM was more devotedly a personal-finance site, remarked that said procedure sounded fine for veggies, fruit, and dry stuff, but (gasp, shudder!!) she would NEVER reuse a bag that had ever held raw meat.

Really? So you never eat off a dish that has held a piece of raw meat, preparatory to tossing it on the grill or the frying pan? {chortle!} Betcha do!

As long as the bag is thoroughly washed — and as long as the plate is thoroughly washed — what’s the difference?

To be sure each baggie is clean, first I squirt a little dish detergent in it, add some water, and squirchel it around so as to massage soap and warm water all over the inside. Then let it sit for awhile, until you get around to washing dishes. Then rinse out the soap, turn the baggie inside out, and set it aside until you have enough to make it worth running the washer. A small basket is convenient for holding your stash.

When you have ten or twenty of the things, drop them in the washer — leaving them inside out. Add a small amount of clothes detergent, set the washer on warm and at the smallest load size, and let ’er rip!

Since I have a washing machine that actually works now, this process really does get the baggies clean, and without wrecking them. Whether one of the horrid front- or top-loading “high efficiency” washers would do the job, I do not know. Of course, those washers being what they are, it would take forever and a day to run the the collected baggies through a wash cycle — but I’d guess if you used the shortest cycle offered (what? only an hour and a half? 😀 ) and selected the gentlest cycle you could extract from the thing, it would probably wash them well enough.

Then either hang them on a line (if you have such a thing) or prop them open on the sink grid or a dish drainer to air-dry. Et voilà! That many baggies that you don’t have to buy (or throw in the landfill) for awhile longer.

Small Serendipities

Some things in life have some surprising little benefits. You’ll recall the monster theft-resistant mailbox I spent $400 on, after purchase and installation. Eight months later, that did pay for itself, yea verily on a day when a large check from PayPal arrived. That’s nice, but a once-in-awhile occurrence. Interestingly, that pricey mailbox has another distinct advantage, one that applies daily: it frees you from having to retrieve the mail every single day, as soon after the mailman shows up as possible.

I love that.

About 98% of the snail mail these days goes directly into the blue barrel. In fact, I’ve even thought of leaving the blue barrel at the curb and asking the mailman to just throw all the mail right into it. 😀

He’s prob’ly not allowed to do that, though…

Yesterday I emptied the mailbox of about ten items, most of them in large 9 x 12 envelopes or just packets of loose paper. Every single item that had been delivered was trash. Is it a minor annoyance, in the large scheme of things, to have to go collect fistfuls of trash that idiots send you in the mail and walk it over to the recycling bin? Well, sure. But nevertheless, it is an annoyance. And IMHO we have enough of those.

With Ft. Knox out there, I pick up the mail two or maybe three times a week. I no longer have to sift through trash every day looking for the few important documents that are mailed to me. So it cuts the annoyance factor some.

Speaking of annoyances, I see Big Pharma has gotten wise to the several ways consumers have contrived to foil the damned consumer-proof lids. The last two bottles of cough medicine I bought each had lids that could not be broken apart with a few hammer blows. In fact, the one I got this morning was engineered so that the inside cap shattered when I belted the damned spinning outside cap with the hammer.

Fortunately, I’m a little old lady and so I save every piece of junk that comes my way. I can not, for the life of me, throw out an old spice jar.

Spice jars hold  just about the amount of liquid in a standard grocery-store cough medicine bottle. And they have lids that work. They are, in a word, perfect for the purpose. Small serendipity, indeed.

Et vous? Found any accidental, unexpected bennies in the small things of life lately?

Image: DepositPhotos, © Supertrooper

Breaking into blister-pack pill packages

At one YouTube tutorial on how to break your pills out of their accursed plastic prison, a commenter wonders angrily who invented unit-dose packaging. Well…I don’t know for sure who invented it, but I did know a guy who said he invented it and who developed and marketed it. He was one of my ex-husband’s legal clients. Seemed like a benign enough fellow…today if I knew where he is, I’d wring his neck.

Actually, I think he’s passed on. Too bad.

Here in Arizona, because of the thriving meth trade, you can’t buy Sudafed or generic pseudoephedrine without begging for it at the pharmacist’s counter, forking over your ID, and signing a form. If you try to go from pharmacy to pharmacy to buy enough to cook up some meth (or to have enough on hand for a really bad allergy season), you risk arrest. And it ALWAYS comes in those hateful unit-dose bubble-wraps.

I dunno about you, but when I have a screaming sinus headache because the wind has been blowing crap into the air all day and all night, the LAST thing I want to do is break my nails and cut my fingers doing battle with a goddamn plastic package to get to my allergy nostrum.

So after I’ve extracted a box containing two flats of annoying blister-pack from the pharmacist, I will take all the pills out of the damn wrapping at once and drop them into a jar. But this task seems to get harder and harder: big pharma works not only to fleece the customer but to make the customer’s life as difficult as possible.

/rant

The advice given by the YouTube lady (above) is less than perfect. Cutting them out with a knife or a pair of scissors wrecks your knife or scissors (the tinfoil backing dulls any blade). And punching the pills out one at a time wrecks your fingers.

Here’s what you need to foil a blister-pack:

a cutting device with a razor blade, such as an Exacto knife or a paint scraper
a Phillip’s screwdriver
a bottle with a label clearly identifying the med
the damned blister-pack full of pills

Hold the blister pack perpendicular to the countertop and give it a gentle shake to cause all the pills to move to one side of the blisters.

On the back (foil) side, slice a cut into the pill-free edge of each bubble.

Turn the package plastic-side up, and use the Phillip’s screwdriver to poke each pill through the backing. A Phillip’s is the right size for a round pill; you may need a large slot screwdriver for bigger oblong pills.

Yes, it is an aggravating hassle, but with this technique you can free up a whole package of Sudafeds in the time it takes to wrestle one or two of them out with your fingers.

You can see, in the photo below, what happens when you try to hack the things out with a pair of scissors. You get sharp pieces of foil, a mess to clean up, and damaged pills. Get out the paint-scraper the screwdriver, and the remaining package (right next to the bottle and the scraper) comes apart quickly, without ruining the pills and without creating a mess of sharp metallic litter.

pillbreakoutDo not use a good knife for this task. That silver metallic backing shit will wreck your knife’s edge, if the damned plastic doesn’t. Keep a cheap Exacto knife or paint scraper on hand for removing pills from their packages.

How to Repel Ants from a Hummingbird Feeder

Humfeeder1Yesterday I went to refill one of the hummingbird feeders near the side deck. Hadn’t seen any hummers around lately, even though it was a third full, so I figured the sugar water had gone stale. It was “stale,” all right: when I unscrewed the bottle I found about a zillion drowned ants clogging the bowl!

Poor little gals. Oh well: they died happy.

The ladies had made their way to the rafter, down the feeder’s hanging rod, down the jar, and thence into the little holes the hummers use to suck up the fake nectar humans like to put out for them.

There’s an easy way to stop this incursion. All you need is the lid from a can of spray paint, some vegetable or olive oil, a hammer and a long, sturdy nail, and a little tape.

Take a look at your spray paint lid: it has a cup in the center that snaps over the can’s sprayer.

HummerCap2This forms a kind of moat between the inner lid and the outer wall of the can’s lid. That moat will hold your secret weapon.

First, take your nail and place it dead center in the middle of the can’s lid, on the top. Gently tap it with the hammer until it breaks through the plastic.

Now push the lid onto the feeder’s hanger, so that the top of the lid faces the ground and the “moat” faces upward.

Tape the lid firmly in place on the hanger. I’ve used black electrician’s tape and outdoor double-sided tape — either works well. Avoid masking tape and scotch tape, which will degrade in weather.

Adjust the lid to make it sit as level as you can — it doesn’t have to be perfect.

Now pour some vegetable oil or some olive oil into the moat section of the lid. No need to fill it all the way up. All you need is enough to cover the bottom of the cap. If the lid doesn’t sit level, pour in enough oil so that the moat contains at least a few millimeters of oil in all parts.

HummerCap3Hang the thing where it where you want it and then hook your feeder to it.

Ants will not cross the oil moat!

This device lasts a very long time. The reason my feeder had ants is that I had removed the one I’d installed several years ago. I’d forgotten about it until I went to do some gardening this spring. When I took a close look at it, I discovered the oil had long since dried up, forming a mummified layer on the bottom of the spray-can lid “moat.” Thinking (wrongly!) that it must not be doing much good, I took it down. And was too lazy to build a new one.

Hence: ants.

Apparently they won’t cross even ancient mummified oil.

Try this. It works. It’s easy.

AnnasHummingbirdPaloAltoNorvig
Latter-day dinosaur…

Hummer image: Norvig. CC BY-SA 3.0, https://commons.wikimedia.org/w/index.php?curid=6347595

Don’t Throw Out that Scratched-up Knife: Polish It!

Hallelujah: here’s a genuine personal finance post. Remember when this blog was a PF site? 😀 Today we’re doing “waste not, want not”: scratched-up knife department. (Notice how we got that SEO strategy in the first paragraph? Clumsy, but effective. I suppose. Thank you, dear Google, for your malign effect on our  writing style…)

This morning, while trying to track down a missing kitchen knife, I found myself mourning the state of all my (expensive!) cutlery, gouged up shamefully some years ago when I tried to sharpen them on my father’s old stone. They were all pretty much ruined by that effort, but I’ve never thrown them out because of course in retirement I can’t afford to replace nine Wüsthof and Sabatier kitchen knives, plus another four Sabatier steak knives.

Even if I could, that degree of waste would frost my cookies.

Knives scratchedMy father could put a razor edge on a knife. He taught  me how to do it. But apparently I didn’t learn well… Every blade that I tried to sharpen this way ended up gouged up with scratches. They still take a fine edge, but they look like the dickens.

Never did find the lost knife . But in the process of searching, it occurred to me to wonder if those scratches could be even partially polished off.

A Google search forthwith brought up this interesting post from an outfit called 100-Year Knives.

Sandpaper! says he.

Oh, yeah? My ears perked up. Sandpaper, eh?

The guy suggests polishing a scratched-up blade much as you would sand a piece of furniture, going from coarse to fine grit paper. Then finish it off with a high-grade metal polish.

I could hear my father shimmering in his funeral urn at the mere thought of this scheme.

The coarsest paper I had out in the garage was 120 grit — not very coarse, but better than nothing. The 100-Year Knives gent suggests starting with 100 grit, then going to 200, then 400 or 600, then 1,000 – 1,500 grit, then polish. The result, shown on his site, is a blade that looks practically new.

By way of experimenting, I took the 120 grit paper to a boning knife that I love but rarely use anymore. (You can, btw, save quite a lot of money on meat by purchasing large chunks of beef, pork, fish, or lamb, whole chickens, and whole turkeys and butchering them into the preferred cuts yourself.) That knife was very badly scratched. I didn’t take a shot of it before I tried my little test, but here’s how it looks now:

Knife boning

It ain’t perfect. But it’s a heckuva lot better than it was. Sorry about the glare — the camera won’t let me turn off the flash. Click on the image for a better view.

This knife was in worse shape than the chef’s knife and the utility knife shown above. A few scratches are still visible, but it’s much, much better than it was. It’s not polished to a high sheen, because I don’t have any real metal polish around the house — I used a little Barkeeper’s Helper, but I think some Simichrome or Flitz will do the job a lot better.

The result is good enough to convince me it’s worth dropping by the Ace and picking up a few more packages of sandpaper in the desired grades. And some metal polish. Even Brasso probably would help, but the kind of stuff guys use to polish the brightwork on their motorcycles is what you want. Simichrome is said to be available at your local Harley shop; or, if you must, from Amazon.

The process dulled the blade on the boning knife, which normally has an edge that exceeds “razor.” So I had to resharpen it. These days I’m using one of these manual sharpeners that resembles a blade-eating electric sharpener (never use an electric knife sharpener if you have a knife you’d like to keep around for a few years):

knifesharpenerThis thing puts a decent edge on your knife without eroding it into the shape of an ice pick and without scratching its sides. Mine is made by Wüsthof, but you can get them in different brands. Once you’ve sharpened the blade (left-hand slot), you hone it on a pair of ceramic sticks (right-hand side), et voila! I hone the kitchen knives after every use, and hardly ever have to do a serious sharpening job anymore. My knives all think tomatoes and raw pork are the same as room-temperature butter.

Take-away PF message: Never throw out something that you can fix.